Thursday, May 8, 2008

Subroutines

Subroutines and functions allow us to package similar instructions together. We've seen built-in subroutines before like:

Math.Sqrt()
Int()
Math.Round()
FormatNumber()
FormatCurrency()
FormatPercent()
str.IndexOf()
str.Length()
str.Substring()
...etc...


Each one of these subroutines/functions does something useful. We can use them to do a certain job, whether it is changing a number value in some way, formatting output or figuring out certain characteristics of strings.

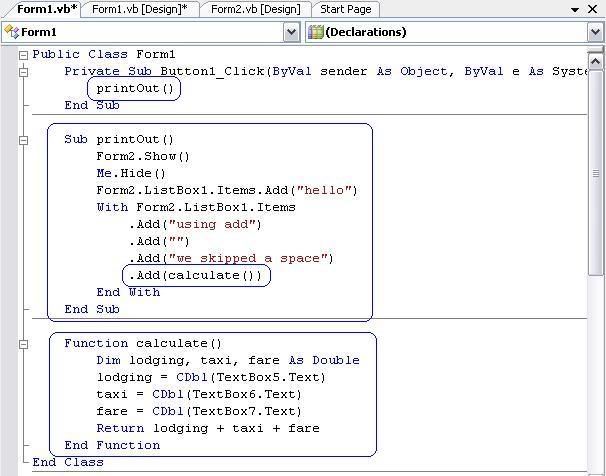
We also learned that we can make our own functions and subroutines to do things that we decide. So let's say that we want to write a print subroutine that will just print out our report, and a calculate() function that will take in three of the expenses and add them together and return the answer. Take a look at the code:
Click for larger image.


You just have to make sure to write the function and subroutine code outside of the button1_click() subroutine and inside the Class Form1 block.

Tuesday, May 6, 2008

2-Dimensional Arrays

We can declare 2-Dimensional arrays by using the following statement:

Dim arrayName(r,c) As Type

Where arrayName is the name of the array you have created and Type is the array's type. The subscripts r and c represent the Row and Column of the array.

So we could declare an array as type double to hold students' grades:

Dim grades(3,3) As Double
'Four students with four grades


This creates a 4x4 matrix with rows and columns starting at 0 and ending at 3:

0 1 2 3
+---+---+---+---+
0 | | | | |
+---+---+---+---+
1 | | | | |
+---+---+---+---+
2 | | | | |
+---+---+---+---+
3 | | | | |
+---+---+---+---+

We can set any cell in the array by issuing a call such as:

grades(1,1) = 90
grades(3,0) = 99
grades(1,0) = 100

With the above code our resulting matrix will look like:

0 1 2 3
+---+---+---+---+
0 | | | | |
+---+---+---+---+
1 |100| 90| | |
+---+---+---+---+
2 | | | | |
+---+---+---+---+
3 |99 | | | |
+---+---+---+---+

If we wanted to set all the cells to a particular value, such as 0 for example, we would have to use a nested loop:

For i As Integer=0 To 3
For j As Integer=0 To 3
grades(i,j) = 0
Next
Next


We can also declare the 2-dimensional array without a size as we can with regular arrays:

Dim arrayName(,) As Type
Dim array2(,) As Type = {{ROW0},{ROW1},{ROW2},...,{ROWm}}

ReDim arrayName(r,s)
ReDim Preserve arrayName(r,s)

Real Examples:

Dim grades(,) = {{99,50,80},{100,80,70},{90,88,90}}
ReDim Preserve grades(3,4)

GetUpperBound

There are two different GetUpperBound calls for 2-dimensional arrays:

arrayName.GetUpperBound(0)
arrayName.GetUpperBound(1)

The first call gives you the upperbound on the number of rows, while the second one gives you the upperbound on the number of columns.

Thursday, May 1, 2008

Some Exam Problems

Problems from the first sample test are as follows (Hopefully without typos):

1) D
2) A
3) C
4) C
5) C
6) C
7) C
8) D
9) B
10) B

Discussion:
Code from #10:
Dim place, i As Integer
Dim character, sentence, phrase(9) As String
sentence = "Every path hath a puddle."
place = 0
i = 0
character = sentence.Substring(place, 1)
Do
If character = " " Then
phrase(i) = sentence.Substring(0, place)
i += 1
End If
place += 1
character = sentence.Substring(place, 1)
Loop Until character = "."


The answer is ``Every path".

We have the following variables:
i 'The current index of the array
place 'The current location in the sentence string
character 'The current character at which we are looking
sentence 'String: "Every path hath a puddle."
phrase() 'Array of size 10


What the code does, loosely, is going through the sentence string one character at a time and every time it hits a space, it saves the all of the i+1 words in the current array index i into the array phrase().

If we look at the part of the code that actually changes the array (highlighted above) then we can see that every time the array is updated it starts at the very beginning and goes up to place characters. Therefore the final array should look like:

0 1 2 ...
+-------+------------+-----------------+----
| Every | Every path | Every path hath | ...
+-------+------------+-----------------+----

Where every cell has one extra word in it from the beginning. The program stops when character = "." which is at the end of the sentence string.

Programming Problem:
a)

Dim arr(1000) As Integer
For i As Integer = 1 To 1000
arr(i) = CInt(InputBox("Enter number: " ,""))
Next

For j As Integer = 1000 To 1, Step -1
lstBoxOut.Items.Add( arr(j) )
Next

b)
Dim arr(1000) As Integer
For i As Integer = 1 To 1000
arr(i) = CInt(InputBox("Enter number: " ,""))
Next

For j As Integer = 1000 To 1, Step -1
If arr(j) Mod 2 = 0 Then
lstBoxOut.Items.Add( arr(j) )
End If
Next

Second Practice Exam

You can find a past exam 2 here. I made a mistake on the first question when I gave you the answers. Here are the correct answers:

1) D
2) C
3) B
4) B
5) D
6) D
7) C
8) B
9) C
10) A

Part II
a) 70^2 = 4900
b) 24^2 = 576

Part III
Answer: 3

Discussion:
The first two loops simply save all of the numbers from the files into arrays a() and b()

sr = IO.File.OpenText("DATA1.TXT")
For k As Integer= 0 To 19
a(k) = CDbl(sr.ReadLine)
Next
sr.Close()
sr = IO.File.OpenText("DATA2.TXT")
For k As Integer = 0 To 19
b(k) = CDbl(sr.ReadLine)
Next


After this, a() contains:
3, 2, 5, 1, 7, 8, 3, 5, 6, 2, 3, 6, 1, 6, 5, 5, 7, 2, 5, 3

and b() contains:
5, 3, 3, 4, 8, 2, 3, 5, 9, 5, 3, 7, 3, 7, 6, 3, 2, 1, 3, 4

This is in order so a(0) equals 3 and a(1) equals 2; b(0) equals 5 and b(1) equals 3 etc...

The last loop is what changes variable c before it is output:

For k As Integer = 0 To 19
If a(k) = b(k) Then
c += 1
End If

Next
lstBox.Items.Add(c)


What the loop is doing is simply traversing all of the indeces (cells) of the arrays one at a time. Variable c only changes if the numbers in the cells are equal. Therefore we only need to count when the numbers are equal to each other:

a() contains:
3, 2, 5, 1, 7, 8, 3, 5, 6, 2, 3, 6, 1, 6, 5, 5, 7, 2, 5, 3

b() contains:
5, 3, 3, 4, 8, 2, 3, 5, 9, 5, 3, 7, 3, 7, 6, 3, 2, 1, 3, 4

This occurs three times, so the answer is 3.
Tuesday, April 8, 2008

Structures

Instead of using parallel or 2-dimensional arrays for storing various information that we would like to manipulate. For example, universities have various information about them that is universal. Each university has the following properties:

  • Name
  • State in which the university is located
  • Date that the university was founded
  • Population


Of course there are many more things that universities have, but this is a start.

Now we could use parallel arrays to store this information (like in our ATM project). Doing so, would mean that we would have 4 arrays to store the above information and that we could use the same index to reference information for a particular university:

Dim uName(3) As String
Dim uState(3) As String
Dim uFounded(3) As String
Dim uPopulation(3) As String

Let's say that we set the following:

uName(1) = "Queens College"
uState(1) = "NY"
uFounded(1) = "1960" 'I'm not sure about the date
uPopulation(1) = "5,000" 'Or the population :-)

So all of Queens College's information is accessible by accessing index 1 of each array. Thus the parallel Nature.

But suppose that we do not want to keep track of four arrays. We could then create a Structure or a container to keep all of this information in one place:

Structure uInfo
Dim name As String
Dim state As String
Dim founded As String
Dim population As String
End Structure

Now we have created our own type and we can declare a variable of this type like this:

Dim college As uInfo

In order to set (or use) any property of colleges, we use the ``dot'' method:

college.name = "Queens College"
college.state = "NY"
college.founded = "1960"
college.population = "5,000"


Declaring an Array of type uInfo

We can declare arrays of any type, including our own defined types.

Dim colleges(10) As uInfo
colleges(0).name = "Queens College"
colleges(0).state = "NY"
colleges(0).founded = "1960"
colleges(0).population = "5,000"

The resulting array will look like (except up to 10):
        0          1    2 ...
+---------------+----+----+
| Queens College| | |
+---------------+----+----+
| NY | | |
+---------------+----+----+
| 1960 | | |
+---------------+----+----+
| 5,000 | | |
+---------------+----+----+


You can see that every cell is broken up into 4 parts that contain the items from the structure itself.

Of course if we had an array of things, it would make more sense to take in the information from a file:

For i As Integer = 0 To 10
colleges(i).name = sr.Readline()
colleges(i).state = sr.Readline()
colleges(i).founded = sr.Readline()
colleges(i).population = sr.Readline()
Next

Student Grades Example

Today we talked about dealing with student grades using arrays. We would have an array that would hold the students' identifying information (such as name or ID number) and then arrays for all of the students' grades. Remember, these are called Parallel Arrays.

Example:

Public Class Form1
'Global Variables:
Dim students(5) As String
Dim hw1(5) As Double
Dim hw2(5) As Double
Dim hw3(5) As Double
...
...


We have declared these arrays as Global so that we will be able to use them in all subroutines, and also so that we will not loose the information stored in them for the duration of the program. Here are what the resulting arrays look like:

students()
0 1 2 3 4
+----+----+----+----+----+
| | | | | |
+----+----+----+----+----+

hw1()
0 1 2 3 4
+----+----+----+----+----+
| | | | | |
+----+----+----+----+----+

hw2()
0 1 2 3 4
+----+----+----+----+----+
| | | | | |
+----+----+----+----+----+

hw3()
0 1 2 3 4
+----+----+----+----+----+
| | | | | |
+----+----+----+----+----+


As we can see, Student1's information will reside in index 1 of all the arrays.

Code

We wrote two subroutines, one to get the information from the user and one to find and print the information for a particular student.

Here is the code for getting the student information:

Sub form_load()
For i As Integer=0 To students.GetUpperBound(0)
students(i) = InputBox("Enter student " & _
CStr(i) & "'s name:")
hw1(i) = CDbl(InputBox("Enter homework 1:"))
hw2(i) = CDbl(InputBox("Enter homework 2:"))
hw3(i) = CDbl(InputBox("Enter homework 3:"))
Next
End Sub


Here is the code for a linear search of a student:

Sub btnSearch_Click()
Dim sname As String
Dim found As Boolean = False
sname = InputBox("Enter student's name:")
For i As Integer = 0 To students.GetUpperBound(0)
If sname = students(i) Then
listbox1.Items.Add(hw1(i))
listbox1.Items.Add(hw2(i))
listbox1.Items.Add(hw3(i))
found = True
Exit For

End If
Next


If Not found Then
MsgBox("Student not found",,"")
End If
End Sub


2-Dimensional Conversion

We can convert the 1-dimensional grade parallel arrays into a two dimensional array. The names of the students must remain a separate 1-dimensional array, however since its type is different. Here are the declarations:


Public Class Form1
'Global Variables:
Dim students(5) As String

Declare hw() with 3 rows and 5 columns:
Dim hw(3,5) As Double
...
...

Resulting in the following arrays:

students()
0 1 2 3 4
+----+----+----+----+----+
| | | | | |
+----+----+----+----+----+

hw()
0 1 2 3 4
+----+----+----+----+----+
0 | | | | | |
+----+----+----+----+----+
1 | | | | | |
+----+----+----+----+----+
2 | | | | | |
+----+----+----+----+----+


Rewritten Code

In the hw() array, each row represents a HW grade and each column represents the grades for each student. Now we will rewrite our subroutines:

Sub Form_Load()
For i As Integer=0 To students.GetUpperBound(0)
students(i) = InputBox("Enter student " & _
CStr(i) & "'s name:")
hw(0,i) = CDbl(InputBox("Enter homework 1:"))
hw(1,i) = CDbl(InputBox("Enter homework 2:"))
hw(2,i) = CDbl(InputBox("Enter homework 3:"))
Next
End Sub


Here is the code for a linear search of a student:

Sub btnSearch_Click()
Dim sname As String
Dim found As Boolean = False
sname = InputBox("Enter student's name:")
For i As Integer = 0 To students.GetUpperBound(0)
If sname = students(i) Then
listbox1.Items.Add(hw(0,i))
listbox1.Items.Add(hw(1,i))
listbox1.Items.Add(hw(2,i))
found = True
Exit For

End If
Next


If Not found Then
MsgBox("Student not found",,"")
End If
End Sub


If we wanted to reduce the three lines dealing with the HW grades into one line, we could add another For loop to loop through the grades:

Sub Form_Load()
For i As Integer=0 To students.GetUpperBound(0)
students(i) = InputBox("Enter student " & _
CStr(i) & "'s name:")
For j As Integer=0 To hw.GetUpperBound(0)
hw(j,i) = CDbl(InputBox("Enter homework " & CStr(j)))
Next
Next
End Sub


Here is the code for a linear search of a student:

Sub btnSearch_Click()
Dim sname As String
Dim found As Boolean = False
sname = InputBox("Enter student's name:")
For i As Integer = 0 To students.GetUpperBound(0)
If sname = students(i) Then
For j As Integer=0 To hw.GetUpperBound(0)
listbox1.Items.Add(hw(j,i))
Next
found = True
Exit For

End If
Next


If Not found Then
MsgBox("Student not found",,"")
End If
End Sub


.GetUpperBound

Remember for 1-dimensional arrays the .GetUpperBound() function returns the number of the last possible index so:
   students.GetUpperBound(0)

returns 4.

For 2-dimensional arrays we have two indeces in which we are interested: one that indicates the highest index of rows, and one that indicates the highest index of columns. Therefore there are two possible GetUpperBound() calls:

'Get the last index of rows
hw.GetUpperBound(0)
'Get the last index of columns
hw.GetUpperBound(1)

We have used this in our rewritten subroutines above.

Monday, April 7, 2008

mp3 Files in VB .NET


You can play mp3 files in VB .NET also. The link above shows how to add a Windows Media Player to your project and to hide if you like. Otherwise you can show the player like shown at left.

You only have to change one line of code if you want it to allow the user to search for files (shown in red):

Private Sub Button1_Click(...)

Const DATA_FILE_EXTENSION As String = ".mp3"
Dim dlgFileDialog As New OpenFileDialog
With dlgFileDialog
.Filter = DATA_FILE_EXTENSION & _
" files (*" & DATA_FILE_EXTENSION & "|*" & _
DATA_FILE_EXTENSION

.FilterIndex = 1
.RestoreDirectory = True
If .ShowDialog() = Windows.Forms.DialogResult.OK Then
'Play the sound file
Me.AxWindowsMediaPlayer1.URL = dlgFileDialog.FileName
End If
End With

End Sub

Using Two Forms

Since there is some confusion about how to use two forms, I have made a video to help clear this up. First of all you have to add a second form to your project before you can use it. To do this, go to:

-> Projects
--> Add Windows Form
---> Add

Then in the Solution Explorer [usually top right] you should see two forms. You can double click one of them to begin design on it. So you have to double click ``Form2'' in order to add things to it. You will have to add a listbox to it.

From form1, you have to add one button. You have to program the button so that it will show form2.

When you run the program, only the first form will be shown by default. Therefore, you will have to manually make the second form appear by writing the following code in the button:

Form2.Show()

If you want the first form to disappear, you will have to do so manually by writing the following code:

Me.Hide()

Notice that it does not say ``Form1.Hide().'' This is because a form can only refer to itself using ``Me'' kind of like in English. You wouldn't talk about yourself in the third person, would you?

In order to skip lines you can simply Add nothing to the listbox:

Form2.Listbox1.Items.Add("") 'Skips a line

Since you will be adding several lines, you may want to use the With option:

With Form2.Listbox1.Items
.Add("Business Expense Report")
.Add("")
.Add("Information for Conference")
.Add(txtBox1.Text)
.Add(txtBox2.Text & " in " & txtBox3.Text)
.Add("")
...etc...
End With


Video of Two Forms
You may click on this link, where you can watch it full screen.

Extras - Images

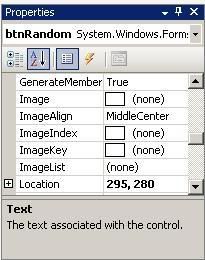
We learned that we can add images to our projects by changing the BackgroundImage property for the form, or the Image property for other objects:

Photo Sharing and Video Hosting at Photobucket

Photo Sharing and Video Hosting at Photobucket

For the BackgroundImage, we can also set the image to be Tiled or Stretched however we like.

We also learned that we could change the images as the program runs. For example to set the button image to something else when it is clicked, we can write inside the Button_Click() subroutine:

Button.Image = Image.FromFile("nameofnewimagefile.jpg")


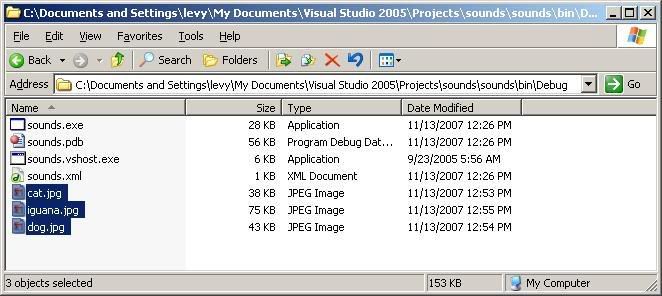
If we place our image files in the debug folder we can simply write the name of the file without having to put the entire path:

Photo Sharing and Video Hosting at Photobucket

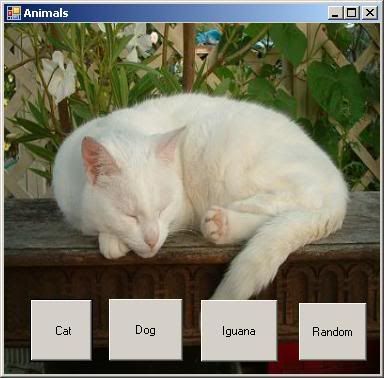
Suppose we want to write a program that will display pictures of different albums depending on which button is clicked. An example is below:

Photo Sharing and Video Hosting at Photobucket

We could use the following code:

Private Sub Btncat_Click(ByVal sender As System.Object, _
ByVal e As System.EventArgs) Handles btnCat.Click
Me.BackgroundImage = Image.FromFile("cat.jpg")
Me.BackgroundImageLayout = ImageLayout.Stretch
End Sub

Private Sub BtnDog_Click(ByVal sender As System.Object, _
ByVal e As System.EventArgs) Handles btnDog.Click
Me.BackgroundImage = Image.FromFile("dog.jpg")
Me.BackgroundImageLayout = ImageLayout.Stretch
End Sub

Private Sub BtnIguana_Click(ByVal sender As System.Object, _
ByVal e As System.EventArgs) Handles btnIguana.Click
Me.BackgroundImage = Image.FromFile("iguana.jpg")
Me.BackgroundImageLayout = ImageLayout.Stretch

End Sub


Private Sub BtnRandom_Click(ByVal sender As System.Object, _
ByVal e As System.EventArgs) Handles btnRandom.Click
Dim randnum As New Random, temp As Integer
temp = randnum.Next(1, 4)
Select Case temp
Case 1
Me.BackgroundImage = Image.FromFile("iguana.jpg")
Me.BackgroundImageLayout = ImageLayout.Stretch
Case 2
Me.BackgroundImage = Image.FromFile("cat.jpg")
Me.BackgroundImageLayout = ImageLayout.Stretch
Case 3
Me.BackgroundImage = Image.FromFile("dog.jpg")
Me.BackgroundImageLayout = ImageLayout.Stretch
End Select
End Sub

Extras - Sound

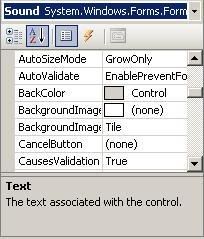
Below is the code for the sound. You will have to replace the red text below with the sound file's name (remember that if you put the sound files in your debug folder you can access it with only the name and not the entire path). Note: This only works with .wav files:


'Alex Maureau, Queens College
'Credits:
'http://www.codeproject.com/vb/net/SoundClass.asp
'by Angelo Cresta


Imports System
Imports System.Runtime.InteropServices
Imports System.Resources
Imports System.IO

Public Class Sound


Declare Auto Function PlaySound Lib "winmm.dll" (ByVal name _
As String, ByVal hmod As Integer, _
ByVal flags As Integer) As Integer

Public Const SND_SYNC = &H0 'play synchronously
Public Const SND_ASYNC = &H1 'play asynchronously
Public Const SND_LOOP = &H8 'play with a loop

Public Shared Sub PlayWaveFile( _
ByVal fileWaveFullPath As String)
Try
PlaySound(fileWaveFullPath, 0, SND_ASYNC)
Catch
End Try
End Sub
End Class

Thursday, April 3, 2008

Arrays

We learned that we can use arrays as containers to hold several variables of the same type. We also learned about why we might want to use such a structure, for example, sorting 10000 names from within a file.

There are a few ways to declare an array:

  • Dim arr( size ) As Type

  • Dim arr( ) As Type = {item1, item2, ...., itemN}

  • Dim arr( ) As Type
    ...
    ...
    Redim arr( newSize )

In each of the examples above, we have the array name and the type (String, Integer, Double etc) in the declaration statement. In the first example, we indicate the size of the array with an Integer value. This will give us an array with size + 1 cells. This is because we will have subscripts/indexes/cells numbered from 0 to Size.

In the last two examples, the size is not specified in the parentheses. In the second example, the size is figured out by the compiler by looking at the number of items in the list being assigned to each cell. In the third example, the size is set sometime later using a Redim statement.

The Redim statement allows us to reset the size of the array as the program runs. It can be useful for things like taking items in from a file, where the total number of items is unknown, or expanding the array when we need to add more items to it. If we have something in the array before we call Redim, the previous items will be lost. We can save them, however, using the Preserve command:

Redim Preserve arr( newSize )

If the new size is smaller than the original size, all items after the new upperbound will be lost.

We can find the upperbound of an array at anytime with the following code:

arrayname.GetUpperBound(0)

Where arrayname is replaced by the name of your array.

Real Examples
Dim names( 10 ) As String
Dim names2( ) As String = {"Allen", "Stacy", "Simon"}


The result of these declaration statements create two arrays, names() which is of size 11 and names2() size 3. The contents of name2() look like this:
 
0 1 2
+---------+---------+---------+
| "Allen" | "Stacy" | "Simon" |
+---------+---------+---------+


Now if we want to extend names2() we can use the Redim statement:

Redim Preserve names2( 4 )
names2( 3 ) = "Max"

The contents of the array will now be:
 
0 1 2 3 4
+---------+---------+---------+--------+--------+
| "Allen" | "Stacy" | "Simon" | "Max" | |
+---------+---------+---------+--------+--------+


Notice that we used the command Preserve so that we would not loose the previous contents of our array.

Tuesday, April 1, 2008

ATM Project - Part 1

Now that we have learned about File I/O, loops and decisions we can start to work on a real project. We will create an ATM simulation and we will continue adding things to it throughout the rest of this course.

First we have to decide how an ATM works. We know that it will require the following operations:

1) Validation (pin # and account number)
2) Deposit Money
3) Withdraw Money
4) Account Status (balance etc)

We will have a text file that contains the account numbers and pins in it:
acctinfo.txt

123456789
1234
234567890
9876


This is kept in the debug folder. When the program begins,

Tuesday, March 25, 2008

Boxes of Stars (Loops continued)

We learned how we could use loops to print out stars in various patterns like a box of stars [code]:


Or even an empty box of stars :


We have to use a Nested For Loop in order to print out lines of stars row by row. The outer loop represents each row, and the inner loop represents each column. Each row was constructed by using a String, since we can only print to a listbox one line at a time.

In the empty stars example we have to use If/Else statements in order to tell if we were printing out one of the borders. If we were at a border (outer or inner control variable is equal to 1 or num, where num is the total number of rows and columns) then we would print out a star, Else we will only print out a space.

Your HW is to print out the empty box of stars. You must ask the user if what number they like and then check to make sure that the number is in a range of 3 to 20.

Tuesday, March 18, 2008

Loops

We finished up Chapter 6.1 in class today. We learned that we could use loops in order to accomplish tasks that should be done several times using Loops. We learned about three types of loop structures:

Do Until
Do While
For Next


We can write a loop using any of these three structures and any loop written in one of these structures can be rewritten using one of the other two. The basic syntax for each of these loops are:


For variable = (starting point) To (ending point)
'Do statements until we reach the ending point
Next 'Update condition variable

'**************************************

'Set condition before entering loop
Do While condition
'Do statements until condition is false
'Update the condition
Loop

'**************************************

'Set condition before entering loop
Do
'Do statements until condition is true
'Update the condition
Loop Until condition


In all three loop structures we have three parts that are the same:
1) A starting point for the condition we are checking
2) An endpoint for the condition
3) An update for the condition

We must have all three things for the loop to execute and end execution. Without (3) from above for example, we would have an infinite loop which is definitely not what was intended.

Also notice that the Do While and the Do Until loops are opposites. Do While loops until the condition is False whereas the Do Until loop will loop until the condition is True. Also the Do Until is always guaranteed to loop at least once. We have no such guarantee with the Do While loop.

Do While Examples

Dim i As Integer = 1
Do While i <= 10
'List out the numbers from 1 to 10
lstOut.Items.Add( i )
i += 1
Loop


Dim i As Integer = 1
Dim num As Integer
num = CInt(InputBox("Enter a #:",""))
Do While i <= num
'List out the numbers from 1 to num
lstOut.Items.Add( i )
i += 1
Loop

Do Until Examples

Dim i As Integer = 1
Do
'List out the numbers from 1 to 10
lstOut.Items.Add( i )
i += 1
Loop Until i > 10


Dim i As Integer = 1
Dim num As Integer
num = CInt(InputBox("Enter a #:",""))
Do
'List out the numbers from 1 to num
lstOut.Items.Add( i )
i += 1
Loop Until i > num

For Next Examples

For( i As Integer = 1 To 10)
'List out the numbers from 1 to 10
lstOut.Items.Add( i )
Next


Dim num As Integer
num = CInt(InputBox("Enter a #:",""))
For( i As Integer = 1 To num)
'List out the numbers from 1 to num
lstOut.Items.Add( i )
Next

Writing to Files

In order to write to files, you will have to create a StreamWriter. Here is an example:

Dim sw As IO.StreamWriter
sw = IO.File.CreateText("newfilename.txt")
sw.WriteLine("This will go in the new file")
sw.Close()

If you use CreateText as shown above, then the file in quotes will be created and ready for use. If the file existed before you opened it, the file contents will be deleted, even if nothing is writen to the file. If you just want to place the new text at the end of the existing file, you can use AppendText() instead of CreateText().

Another thing you should know, is that the text will not be written to the file unless you Close() the file.

If you simply place the name of the file in quotes without an absolute path, then the file will be saved in the MyDocuments\Visual Studio 2005\Projects\[project name]\[project name]\bin\Debug folder, where [project name] is the name of your project.

File I/O [Reading a File]

Reading Data From Text Files:

There are a few rules to follow when trying to read data from a text file. Text files are written using the standard program Notepad or recently Notepad++. They have the extension .txt. So here are the rules to use them in a VB program.

1. Declare a variable that will handle the reading. For the purpose of the examples below:

Dim sr As IO.StreamReader


The StreamReader is part of the IO (input.output) library. This will read a stream of characters coming from the internet or a disk. The text file will be located on the disk drive.

2. Then, using the variable, execute the statement:

sr = IO.File.OpenText( filename )

where filename is the exact name and path of the text file. For the purpose of the course, ALL text files must be in the bin\Debug folder where your project is located. Here is an example path:

My Documents\Visual Studio 2005\Projects\program\program\bin\Debug

That is indeed a long path. Place the text file in that folder so you don't need to type out the whole name each time.

3. Then, read the data lines IN ORDER, the same order they appear in the file.

To place data from the file into a variable, use the ReadLine function available from the StreamReader library. Using the rule about input from the InputBoxes, everything read from a file will be stored as a string. If you need to gather a numeric value from the file, use the appropriate conversion function from the previous section.

strVar = sr.ReadLine 'any string variable
numVar = CDbl( sr.ReadLine ) 'a double type variable

If all the statements in the file have been read, each subsequent ReadLine call will get a value of Nothing by default.

4. Finally, close the file and continue with the program (if anything else is left).

sr.Close()

That is it in terms of gathering data from a text file. Here is a short program from the textbook example. The text file is called "PAYROLL" and contains the following data IN ORDER:

Mike Jones
7.35
35
John Smith
6.75
33

Program:


Private Sub btnCompute_Click(...) Handles btnCompute.Click

Dim sr As IO.StreamReader = IO.File.OpenText("PAYROLL.TXT")
'The file is in the bin subfolder in Debug

Dim name As String
Dim hourlyWage, hoursWorked, salary As Double

name = sr.ReadLine
hourlyWage =
CDbl(sr.ReadLine)
hoursWorked =
CDbl(sr.ReadLine)
salary = hourlyWage * hoursWorked
lstPayroll.Items.Add(name &
" " & FormatCurrency(salary))

name = sr.ReadLine
hourlyWage =
CDbl(sr.ReadLine)
hoursWorked =
CDbl(sr.ReadLine)
sr.Close()

salary = hourlyWage * hoursWorked
lstPayroll.Items.Add(name &
" " & FormatCurrency(salary))

End Sub


We already know how to read from a file, by creating a StreamReader. For example:

Dim sr As IO.StreamReader
sr = IO.File.OpenText("nameOfFile.txt")

We can then read through the file by using a loop:

Do While sr.Peek <> -1
lstBox.Items.Add(sr.ReadLine)
Loop


Imports

Ever get tired of writing ``IO'' in front of everything dealing with files? You can import it at the top of your code and then you will not have to type it ever again:

Imports System.IO
Public Class
Form1

Notice that it goes BEFORE the class declaration of Form1. Now the code for declaring and using a StreamReader changes:

Dim sr As StreamReader
sr = File.OpenText("nameOfFile.txt")

Tuesday, March 4, 2008

Select Case

We will finish Chapter 5.3 on 3/6 which ends with Select Case. Remember that Select Case is just another structure that works like If statements. For example:

Dim num As Integer
num = CInt(txtIn.Text)
Select Case num
Case 1
MsgBox("You entered 1",,"")

Case 2 To 5
MsgBox("You entered a number from 2-5",,"")

Case 7,9,11
MsgBox("You entered an odd number from 7-11",,"")

Case Is > 12
MsgBox("You entered a number greater than 12",,"")

Case Else
MsgBox("You entered some other number",,"")

End Select

All of this works like the classic If/ElseIf/Else structure. so we could rewrite the above using If statements:

Dim num As Integer
num = CInt(txtIn.Text)
If num = 1 Then
MsgBox("You entered 1",,"")
ElseIf 2 <= num And num <= 5 Then
MsgBox("You entered a number from 2-5",,"")
ElseIf num = 7 Or num = 9 Or num = 11 Then
MsgBox("You entered an odd number from 7-11",,"")
ElseIf num > 12 Then
MsgBox("You entered a number greater than 12",,"")
Else
MsgBox("You entered some other number",,"")
End If


You can also use Select Case to compare Strings just like you can with If statements.

Friday, February 29, 2008

If Statements and Strings

We are able to compare strings using If statements. This means that we can see if two strings are the same string [i.e. "george" = "george"], but more importantly we are able to compare the relationship between strings. That is, we can tell if a certain string comes before another string:

Dim strA, strB As String
strA = "cat"
strB = "dog"

If strA < strB Then
MsgBox(strA & " comes before " & strB, "")
ElseIf strA > strB Then
MsgBox(strA & " comes after " & strB, "")
Else
MsgBox(strA & " equals " & strB, "")
End If


Gives answer of "cat comes before dog"

One important thing to remember, however is that capital letters come before lowercase letters. This is because of the ASCII/ANSI coding of each letter in the computer.

The computer does not understand the word "cat" as we humans do. For the computer each letter has a binary value [binary = 1's and 0's]. Letters are given numbers in sequential order from 65-90 for A-Z and 97-122 for a-z. Since the capital letters have lower values, they are less than the lowercase letters and therefore "come first."


Dim strA, strB As String
strA = "cat"
strB = "Zebra"

If strA < strB Then
MsgBox(strA & " comes before " & strB, "")
ElseIf strA > strB Then
MsgBox(strA & " comes after " & strB, "")
Else
MsgBox(strA & " equals " & strB, "")
End If


Gives answer of "Zebra comes before cat"

If you want to eliminate case, you can use the .ToUpper and .ToLower functions.

If / ElseIf / Else [Continued]

We learned in class that If statements could be more complicated than just one case or the other. We learned that there may be more than one thing that we want to check, and we can do this by using a different If/ElseIf/Else structure:

If condition1 Then
'Do these statements for condition 1
ElseIf condition2 Then
'Do these statements for condition 2
Else
'Do these default statements
End If


We also learned that there can be several ElseIf statements before hitting the final Else.

More Boolean Operators
We learned that we can check more than one relationship at a time by combining them using one of two special operators:

Operator            Example
And 0 <= x And x <= 10
Or 0 <= x Or x <= 10
Not Not ( x = y )


The And operator is only true if both conditions on either side are true. If either side is false, then the entire combined expression is false.

The Or operator is different, because it only need one of the expressions to be true in order for the entire expression to be true. So if one side is true then the entire expression is true, and if both sides are false then the entire combined expression is false.

Truth Tables
We can make truth tables in order to clarify these expressions.

Suppose we use x to represent Condition 1 and y to represent Condition 2. So we have the following relationships:


+-----+-----+--------+----------+----------+
| x | y | Not x | x And y | x Or y |
+-----+-----+--------+----------+----------+
| T | T | F | T | T |
+-----+-----+--------+----------+----------+
| T | F | F | F | T |
+-----+-----+--------+----------+----------+
| F | T | T | F | T |
+-----+-----+--------+----------+----------+
| F | F | T | F | F |
+-----+-----+--------+----------+----------+


T represents True
F represents False

So if the conditions x and y are combined with an And operator, the entire combined condtion is only true if both x and y are True [T]. We can see this in the table above. And of course: x And Not x results in a column of all False entries.

Also, anytime that x or y are True and are combined with an Or operator the entire combined condition is True. We can see this relationship in the table as well.

Not is an operator that takes the current condition and makes its value the opposite. That is, if a condition is True then Not condition makes it False.

Thursday, February 28, 2008

If Statements

We are covering If Statements this week. Let's see how if statements work:

If condition Then
'Do these statements
Else
'Do these alternate statements
End If


The condition is what we have to check, and if it is true then we do the statements that are immediately inside the If statement, otherwise we do what is in the Else statement. An English pseudocode example could be:

If It's sunny outside Then
'Go play frisbee outside
Else
'Stay inside and read
End If


Of course this is only an English example and will not make sense to the computer in this format.

Operators
Most often what we are trying to figure out has to do with relationships of things. For example, we had a calculator problem with a potential bug of division by 0. We could use If statements to decide If we are trying to divide by 0. In order to do this, we need to use some boolean operators. These operators allow us to figure out the relationship between two things, for example, is a number larger than another number, smaller than the other number or equal to it?

Our operators are:

= Equal to
<> Not Equal to
< Less Than
> Greater Than
<= Less Than or Equal to
>= Greater Than or Equal to


These operators compare the item on the left to the item on the right and return True if the relationship is true or False if the relationship is false. The items that we compare could be Numbers or Strings.

Therefore, if we want to see if a number is Equal to another number (in this case zero) we would use the equals operator. If num2 is equal to zero then we output an error message, otherwise we do the division (which is not shown here):

If num2 = 0 Then
MsgBox("Division by zero error!",,"ERROR")
Else
'Do Division
End If


Now we have a piece of code that we can use, or modify if we like. We could have used a different method by using the Not Equals Operator:

If num2 <> 0 Then
'Do Division
Else
MsgBox("Division by zero error!",,"ERROR")
End If


This says that if num2 is NOT equal to zero then do the division, otherwise output an error message.

Note: We do not have to have an Else with each If statement. We could just write:

If num2 <> 0 Then
'Do Division
End If


But nothing happens if a division by zero is attempted. The user might like to know why nothing happened, especially if they accidentally wrote 0 instead of another number like 10

In the next class we will go over this longer example.

String formatting

As promised, here are the notes on section 3.5 Input/Output (by Alex)
________________________________________________________________

Formatting:

There are various ways of formatting output in VB. One way is with some more built in functions:

FormatNumber( number or variable to format, places to round )

This will take a number and format it to a certain number of decimal places. Below is an example of using this function:

FormatNumber( 12345.628, 2) will evaluate to 12,345.63
FormatNumber( 444212.333, 0) will evaluate to 444,212

FormatCurrency( number or variable to format, places to round )

This will take a number and format it to a currency value to a certain number of decimal places. Below is an example of using this function:

FormatCurrency( 12345.628, 2) will evaluate to $12,345.63
FormatCurrency( 345.4426, 3) will evaluate to $345.443

FormatPercent( number or variable to format, places to round )

This will take a number and format it to a percentage value to a certain number of decimal places. Below is an example of using this function:

FormatPercent( 0.185, 2) will evaluate to 18.50%


Now, notice with the Percent and Currency function, the appropriate symbol is added to the outputted value. There are other Format functions available but these are again the most frequently used.

To format a string output, you use something called zones. Since I cannot draw once again, I will have to refer you to the textbook example 1 in section 3.5. But here is how the formatting variable will look:

Dim fmtStr As String
fmtStr = "{0,15}{1,8}{2,9}"

Here is how that looks. Notice that there is no spaces between the curly braces inside the string. Also notice each section has two numeric values. The first value is the zone number so in the above example they would be 0...1...2. The second value is the number of spaces to format so these would be 15...8...9. Here is how to use it in a program:

lstOut.Items.Add( String.Format( fmtStr,item 1, item 2, item 3 ) )

The number of items in the above line needs to match the number of zones you declare in the formatting string. Again, see example 1 for the full diagram as well as a short program.

Monday, February 11, 2008

String Lecture notes (from Alex)

I am available for tutoring in A205. My schedule is posted online at the department's website.
_____________________________________________________________________________

Formally, a string is a sequence of characters that can be treated as a single item. In other words, anything and everything together. Here are some examples:

"34huwnacbui23h4r"
"The quick brown fox."
"My name is: John Doe"

Here is how to declare a string variable:

Dim varName As String

By default, the string variable is automatically set to empty, or Nothing.

(See example 1 in 3.4 for a basic example)

For the purpose of the HW assignment (37-40 in section 3.4), you were gathering certain information from textboxes. Again, by default, anything you gather from a textbox is a stored as a string. So as a brief example, say you entered a number and tried to place it in the appropriate variable. This will not work since a string cannot be placed into a variable declared of a numeric type. There is a way to fix this. In VB, there are built-in functions that will correctly convert a string to a number or certain other variable types. Below are some examples of that:

CDbl() -- means Convert to a double. This is the most commonly seen conversion function in the textbook since most variables are declared as a Double type. This will convert the string entered into a double.

CInt() -- means Convert to an integer. Will take a string and convert to the Integer type.

CLng() -- means Convert to a Long integer. Will take a string and convert to the Long type.

CStr() -- means Convert to a String. Yes, there is a function that will "go the other way" so to speak. This will be used for output purpose mostly though there may be an occasion to use for input purpose.

Below is a short program to demonstrate some conversion functions:

Private Sub btnAdd_Click(...) Handles btnAdd.Click

'This program will gather two numbers from the user and output the sum
Dim num1, num2, sum As Double

num1 = CDbl(txtNum1.Text)
num2 = CDbl(txtNum2.Text)

sum = num1+num2

txtOut.Text = CStr("The sum is: " & sum)

End Sub

Now, just one note from the above program. In the last line, you see a & symbol. This is called the concatenation symbol. It will join two or more pieces of data together. So in this case, the user will see the following message in the textbox if the sum was 7: The sum is: 7 Concatenation will be seen quite frequently for the rest of the semester.

(See example 3 for an example of concatenation).

STRING FUNCTIONS:

In VB, there are certain functions that you can apply to strings. Below are some examples using them. For the purpose of all the examples below, use the following definition of a string:

Dim str As String

str.Length()
-will return the length of a string as an integer. Say the string was "Hello". You will get an answer of 5.

str.ToUpper()
-will change the string to all uppercase characters (not numbers or symbols). Say the string is "Hello James 1234!", the function will change this to "HELLO JAMES 1234!"

str.ToLower()
-just the opposite of ToUpper()

str.Trim()
-will eliminate all the white spaces at the front and end of a string. Say the string is " Hello "
Applying this function, you will get "Hello"

The following two functions contain something called parameters (explained more in chapter 4). These are data values that are required for the function. Also, these functions require the knowledge of how a string looks in memory. Since I cannot draw with the blog, I will do my best to show it. The pipe symbol | will be used to separate the individual characters:

Say you declare a string variable and give it the value, somewhere in the program, "John". Here is how it would look:

J | o | h | n | \0
0 | 1 | 2 | 3 | 4

The numbers appearing below the string are called indices's. They are the "position" of the certain character. The \0 is called the terminating character or the null string. This is basically the end of the string. So let's look at the function:

str.IndexOf( string ) OR str.IndexOf( string, starting position ).

This function will return the index of the FIRST OCCURRENCE of a string you give it to find. If it cannot find it, it will give you -1. So let's use the string "fanatic". Looking at it in memory (this is the best I could do):

f | a | n | a | t | i | c | \0
0 | 1 | 2 | 3 | 4 | 5 | 6 | 7

Let's apply the function.

str.IndexOf("ati") will give you an answer of 3 since the first occurrence of this string begins at position, or index of 3.

str.IndexOf("a") will give you an answer of 1 since the first occurrence of this string begins at position, or index, 1.

str.IndexOf("nt") will give you an answer of -1 since this string does not exist!

str.IndexOf("a", 4) will give you an answer of -1 since starting at position 4, there is no matching string.

Now let's look at the following function called the sub string:

str.SubString( starting position, how many places to move ) OR str.SubString( starting position )

This function will now return a portion of a string instead of the index of a portion of a string. If you do not specify the second parameter, it will go all the way to the end of a string. So now let's use the "fanatic" string again.

str.SubString( 0, 3 ) will return "fan" since beginning at position 0 and going 3 places you get "fan"

str.SubString( 4, 2) will return "ti" since beginning at position 4 and going 2 places, you get "ti"

str.SubString( 4 ) will return "tic" since beginning at position 4 and going to the end you get "tic"

(See example 5 in 3.4 for a great example of the previous string functions).

For what we covered on Input Boxes and Message Boxes, please refer to the end of that chapter since I cannot draw on the blog. If there are any concerns about them, please let me know next week.

Monday, February 4, 2008

Chapter 3.3: Numbers

We went over numbers in the second to last class. We also learned about listboxes. A listbox is an object in which we can add things (like a list) one line at a time. There are two actions that we learned with listboxes:

listbox1.Items.Add( ... )
listbox1.Items.Clear()

Note: With the .Add() feature, the item that is to be added to the listbox is in the parentheses. Therefore we can add numbers to the listbox by placing them in the parentheses of .Add().

.Clear() simply erases whatever is in the listbox.

Example:

lstResults.Clear()
lstResults.Items.Add(8)
lstResults.Items.Add(4+3)
lstResults.Items.Add(3*9)


First the listbox is cleared (erased) with the Clear() statement. Then we will see the following:

8
7
27

Notice that the mathematic expressions are evaluated before the answer is printed.

Built-in Functions

We learned about some mathematical functions that we can use to make calculations easier:

  • Math.Sqrt()
  • Int()
  • Math.Round()


Math.Sqrt() returns the square root of the mathematical expression placed in the parentheses.

Int() returns the lower bound integer value of the mathematical expression in placed in the parentheses.

Math.Round() returns the upper bound real value of the mathematical expression in placed in the parentheses. We are able to specify the number of decimal places we would like to round the value to as well.

So the following code:

listbox1.Items.Add( Math.Sqrt( 16 ) )
listbox1.Items.Add( Math.Round( 9.2675 ) )
listbox1.Items.Add( Int( -9.2675 ) )

would yield the following results:

4
9.268
-10

Also remember that we can place any mathematical expression in the parentheses so we could even evaluate things as complicated as:

Math.Round( Math.Sqrt(19*20)/50+79, 3 )

Variables
A variable is just a name for a place in memory that we can use as temporary storage. We learned that we could use variables to store numerical values in order to make our arithmetic operations more flexible.

First we must declare the variable:

Dim varname As Type

varname can be any name we choose as long as it:
  1. begins with a letter
  2. uses legal characters such as letters, numbers and underscores
  3. is not used somewhere else in the program. For example the name of a form or listbox


The Type must also be given when the variable is declared. There are two types for numbers: Integer and Double. The type must be given when a variable is declared so that the compiler will know how much memory to allocate for the variable, and every type has a different amount of memory that it needs.

So here is an example declaration:

Dim num As Integer

You will notice that the intellisense menu will pop up as you are declaring variables.

Sunday, February 3, 2008

Installation of VB Studio

You can go to:

http://msdn2.microsoft.com/en-us/vstudio/aa718407.aspx

and click on Download and save the executable. After it finishes downloading double click the executable file to install Visual Studio 2005.

The system requirements are listed on the right-hand-side of the page. Installation should work with default choices. Make sure that you register your installation so that you can keep using it for the semester. You can use fake information if you like, though I think you have to use a real email address to get the registration key.

Feel free to email me if you have problems.

Monday, January 28, 2008

Welcome to CS 80!

This blog will be used for class notes to help clarify some of the harder concepts of the class. You are welcomed to comment any post you like and ask questions.

We also have a listserve that you can join where I will make announcements and you are encouraged to ask questions. The tutors and other lab instructors are also members of the listserve and may make their own announcements and answer questions as needed. I am hoping that this will make things easier for us to keep in touch.

You can join by using the below:
Google Groups
Subscribe to QC CS 80
Email:

Visit this group


We have one tutor for CS 80 this semester: Alex Maureau. Emails can be found under the ``Contacts'' section of the class website. The tutoring schedule will be up later. There are also two other lab instructors for the evening section: Daniel Gutlove (T/Th eve) and Smitha Kakkuzhi (M/W eve) whose contact information is also found on the class website. Office hours will be posted later, as will the schedule.

The first lab is: http://venus.cs.qc.edu/~jlevy/cs80/intro.html. See you on Tuesday!